SHURE MXA310W | ไมโครโฟน Table Array สำหรับติดตั้งบนโต๊ะ
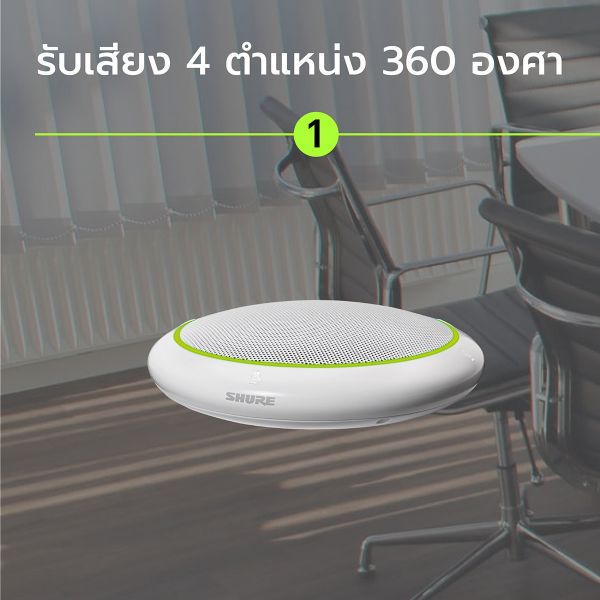
อาร์เรย์แบบตั้งโต๊ะ Microflex®Advance™ เป็นไมโครโฟนตั้งโต๊ะแบบเครือข่ายระดับพรีเมียมสำหรับสภาพแวดล้อมการประชุมทาง AV รวมถึงห้องประชุม ห้องประชุม และพื้นที่อเนกประสงค์ เทคโนโลยีที่ปฏิวัติวงการจากชุด Shure DSP รวมถึง Steerable Coverage™ พร้อมรูปแบบโพลาร์ที่เลือกได้บนช่องสัญญาณอิสระ 4 ช่องเพื่อบันทึกเสียงของผู้เข้าร่วม รูปแบบขั้ว Toroid ใหม่ที่เป็นนวัตกรรมใหม่ให้การครอบคลุม 360° ในขณะที่ปฏิเสธเสียงจากไมโครโฟนโดยตรง ควบคุมไมโครโฟนด้วยซอฟต์แวร์ Shure Designer หรือเว็บแอปพลิเคชันบนเบราว์เซอร์ ไมโครโฟนผสานรวมอย่างไร้รอยต่อกับระบบเสียงดิจิทัลบนเครือข่าย Dante™ และตัวควบคุมที่ตั้งค่าไว้ล่วงหน้าของบริษัทอื่น ซึ่งรวมถึง Crestron และ AMX เพื่อมอบประสบการณ์การประชุมผ่าน AV คุณภาพสูงที่ดึงดูดผู้ผสานรวม ที่ปรึกษา และผู้เข้าร่วมการประชุมได้อย่างเท่าเทียมกัน
**ราคาต่อตัว** (ราคารวม VAT 7% แล้ว)
หมายเหตุ :
- - กรุณาเช็ค Stock สินค้ากับเจ้าหน้าที่ ก่อนสั่งซื้อทุกครั้ง
- - ไม่สามารถนำส่วนลดเปลี่ยนเป็นเงินสดได้
- - หากมีการเปลี่ยนแปลงโปรโมชั่น ทางบริษัทขอสงวนสิทธิ์ในการที่จะไม่แจ้งให้ทราบล่วงหน้า
Tel: 02-991-8600, 086-514-5515
SHURE MXA310W ไมโครโฟน Table Array สำหรับติดตั้งบนโต๊ะ
คำอธิบายทั่วไป
อาร์เรย์แบบตั้งโต๊ะ Microflex®Advance™ เป็นไมโครโฟนตั้งโต๊ะแบบเครือข่ายระดับพรีเมียมสำหรับสภาพแวดล้อมการประชุมทาง AV รวมถึงห้องประชุม ห้องประชุม และพื้นที่อเนกประสงค์ เทคโนโลยีที่ปฏิวัติวงการจากชุด Shure DSP รวมถึง Steerable Coverage™ พร้อมรูปแบบโพลาร์ที่เลือกได้บนช่องสัญญาณอิสระ 4 ช่องเพื่อบันทึกเสียงของผู้เข้าร่วม รูปแบบขั้ว Toroid ใหม่ที่เป็นนวัตกรรมใหม่ให้การครอบคลุม 360° ในขณะที่ปฏิเสธเสียงจากไมโครโฟนโดยตรง ควบคุมไมโครโฟนด้วยซอฟต์แวร์ Shure Designer หรือเว็บแอปพลิเคชันบนเบราว์เซอร์ ไมโครโฟนผสานรวมอย่างไร้รอยต่อกับระบบเสียงดิจิทัลบนเครือข่าย Dante™ และตัวควบคุมที่ตั้งค่าไว้ล่วงหน้าของบริษัทอื่น ซึ่งรวมถึง Crestron และ AMX เพื่อมอบประสบการณ์การประชุมผ่าน AV คุณภาพสูงที่ดึงดูดผู้ผสานรวม ที่ปรึกษา และผู้เข้าร่วมการประชุมได้อย่างเท่าเทียมกัน
คุณสมบัติ
ความครอบคลุมที่กำหนดค่าได้
- การครอบคลุมที่บังคับเลี้ยวได้มอบการหยิบที่แม่นยำสำหรับ 4 แฉกอิสระ
- Shure DSP Suite ให้การผสมอัตโนมัติที่รวดเร็วและการปรับช่องสัญญาณให้เท่ากัน
- รูปแบบขั้ว Toroid ที่เป็นนวัตกรรมใหม่ให้การครอบคลุม 360° ในขณะที่ปฏิเสธเสียงจากเหนือไมโครโฟนโดยตรง เพื่อลดเสียงรบกวนที่เกิดจากระบบ HVAC หรือเครื่องฉายวิดีโอ
การควบคุมซอฟต์แวร์
- ซอฟต์แวร์ Shure Designer ให้การควบคุมไมโครโฟนและรูปแบบที่ครอบคลุม
- ด้วย Designer คุณยังสามารถออกแบบการครอบคลุมด้วยอุปกรณ์ออนไลน์และออฟไลน์ และกำหนดเส้นทางเสียงระหว่างอุปกรณ์ Shure
- หากไม่มีตัวออกแบบ ให้ใช้เว็บแอปพลิเคชันบนเบราว์เซอร์เพื่อควบคุมไมโครโฟน
การเชื่อมต่อเครือข่าย
- ช่องสัญญาณเสียงแยกสี่ช่องและช่องสัญญาณ automix เพิ่มเติมจะถูกส่งผ่านสายเคเบิลเครือข่ายเส้นเดียว
- เสียงดิจิทัล Dante™ อยู่ร่วมกันอย่างปลอดภัยบนเครือข่ายเดียวกับ IT และควบคุมข้อมูล หรือสามารถกำหนดค่าให้ใช้เครือข่ายเฉพาะได้
- สตริงการควบคุมพร้อมใช้งานสำหรับตัวควบคุมที่ตั้งค่าไว้ล่วงหน้าของบริษัทอื่น รวมถึง Crestron และ AMX
การออกแบบอย่างมืออาชีพ
- การออกแบบอุตสาหกรรมที่เรียบง่ายและเพรียวบางผสมผสานกับห้องประชุมและห้องประชุมแบบร่วมสมัย
- วงแหวนไฟ LED หลากสีที่กำหนดค่าได้ตรงกับสภาพแวดล้อม แสดงการตั้งค่าการปิดเสียง และยืนยันการตั้งค่าความครอบคลุม
- มีให้เลือกทั้งสีขาว ดำ และอะลูมิเนียม
System Overview

① Dante audio, power, and control
A single network cable delivers 4 discrete audio channels from each microphone onto the Dante network, where they can be routed to any Dante-compatible devices.
② Analog audio (microphone to network)
Analog equipment, such as a wireless microphone system or a gooseneck microphone on a podium, connects to the Dante™ audio network through a Shure Network Interface (model ANI4IN) for a completely networked conferencing system.
③ Far-end audio (network to loudspeakers)
Dante™-enabled loudspeakers and amplifiers connect directly to a network switch. Analog loudspeakers and amplifiers connect through a Shure Network Interface (model ANI4OUT), which converts Dante™ audio channels into analog signals, delivered through 4 discrete XLR or block connector outputs.
④ Device control and Dante audio
A computer running Dante Controller and Shure Designer provides control over the following:
Control:
A computer connected to the network controls the microphone with Shure Designer software. You can remotely control coverage, muting, LED behavior, gain, and network settings.
Audio:
Route audio with Dante™ Controller or Shure Designer software. Dante™ Virtual Soundcard enables audio monitoring and recording directly on the computer.
System Planning and Gear Requirements
Setting up the Audio Network
Shure networked conferencing systems are comprised of Microflex Advance microphones and network interfaces, which operate entirely on a Dante network. Additional hardware, including network switches, computers, loudspeakers, and audio processors are described in the hardware component index.
Shure components shown in this diagram:
Microflex Advance Microphones
The MXA910 and MXA310 are equipped with Dante outputs, and connect directly to a network switch.
Audio Network Interfaces
The interfaces are used to connect analog devices such as loudspeakers and analog microphones to the network.
ANI4IN: Converts 4 analog signals (separate XLR and block connector models available) into Dante digital audio signals.
ANI4OUT: Converts 4 channels of Dante audio from the network into analog signals.


This diagram shows Microflex Advance components in context, with two rooms communicating through video codecs.
Controlling Hardware and Audio Over the Network
Audio and hardware settings are managed through a computer connected to the same network.
Shure Hardware and Audio
Each Microflex Advance component has a web application which provides mixing and configuration tools to optimize sound quality.
Expanded Control for Analog Devices
Analog devices that are connected to the network through a Shure network interface (ANI4IN/ANI4OUT) benefit from additional remote control: Volume levels, equalization, and signal routing are managed through the web application. For example, adjusting loudspeaker volume or muting a wired microphone, which would normally be done from the hardware, can now be controlled remotely over the network.
Dante Signal Routing
You can manage signal routing with Dante Controller or Shure Designer software.
System Use Cases
These use cases will help you understand how Shure devices fit in conference rooms, huddle rooms, and multipurpose spaces.
Each diagram includes:
- Signal flow and connections
- Required devices
Power Over Ethernet and Hardware Requirements
All Shure devices included in these use cases require Power over Ethernet (PoE, class 0). Refer to the Dante and Networking section for additional information on cable and network switch requirements.
Telephone Conference with Shure MXW Audio Network Interface

① Array microphone to Shure MXWANI
Connect the microphone output to port 1 on the MXWANI with a network cable. Port 1 provides the necessary Power over Ethernet (PoE).
② Computer to Shure MWXANI
Connect a computer to the ANI on port 2 or 3 with a network cable to provide control of the array microphone and other networked components.
③ Shure ANI analog outputs to audio processor
Step 1: Route signals with Dante Controller software
Route the channels from the microphone (Dante transmitter) to the MXWANI channels (Dante receiver). This establishes the discrete channels to deliver through the analog outputs.
Step 2: Connect the MXWANI outputs to the processing device inputs
Block connector outputs on the MXWANI send balanced audio signals to the inputs on the processing device, which provides digital signal processing (such as acoustic echo cancellation).
④ Connection to far end
Connect the audio processor to a VOIP server or telephone line to send and receive audio between the near end and far end.
⑤ Audio from far end to amplifier
Route the far-end audio through the audio processor output to an amplifier.
⑥ Amplified audio signal to loudspeakers
Connect the loudspeakers to the amplifier to hear the audio from the far end.
Telephone Conference with Dante-enabled Audio Processor
① Array microphone to network switch
Connect the microphone output with a network cable to any port on the switch that supplies Power over Ethernet (PoE).
② Computer to network switch
Connect a computer to the network switch to provide control of the microphone and other networked components.
③ Network switch to Dante audio processor
Connect the Dante audio processor to the network switch to provide:
- Digital signal processing (acoustic echo cancellation)
- Digital-to-analog conversion to deliver Dante audio over an analog (VOIP or telephone line) output.
- Analog-to-digital conversion to deliver analog audio from the far end onto the Dante network.
④ Connection to far end
Connect the output from the audio processor to a VOIP server or telephone line to deliver audio between the near end and far end.
⑤ Audio from far end to amplifier
Route the far end audio through the audio processor output to an amplifier.
⑥ Amplified audio signal to loudspeakers
Connect the loudspeakers to the amplifier to deliver the audio from the far end.
Telephone Conference with Breakout Boxes and Audio Processor
In this scenario, two MXA310 microphones are used for a total of 8 Dante audio channels. Using two network interfaces, the Dante channels are converted to analog signals for acoustic echo cancellation.
① Microphone to network switch
Connect the array microphone output with a network cable to any port on the switch that supplies power over ethernet (PoE).
② Computer to network switch
Connect a computer to the network switch to provide control of the microphone and other networked components through the software control panel.
③ ANI4OUT (digital-to-analog conversion)
From the network switch: Use network cables to connect each ANI4OUT to the network switch. A single ANI4OUT receives 4 channels of Dante audio, and converts them to 4 analog signals, delivered through XLR outputs or block connectors. Using two of them, all 8 channels from the microphones can be connected to analog inputs on an audio processing device.
To a processing device: Route the ANI4OUT outputs to the processing device inputs to provide digital signal processing (acoustic echo cancellation).
④ Connection to far end
Connect the output from the audio processor to a VOIP server or telephone line to deliver audio between the near end and far end.
⑤ Audio from far end to amplifier
Route the far end audio through the audio processor output to an amplifier.
⑥ Amplified audio signal to loudspeakers
Connect the loudspeakers to the amplifier to deliver the audio from the far end
Web Conferencing Software with Dante Virtual Soundcard
① Microphone to network switch
Connect the microphone output with a network cable to any port on the switch that supplies Power over Ethernet (PoE).
② Computer to network switch
Connect a computer to the network switch to provide control of the microphone and other networked components through the software control panel. The computer also runs Dante Virtual Soundcard, Dante Controller, and the web conferencing software.
- Dante Virtual Soundcard / Controller: Turn on the Dante Virtual Soundcard and use Dante Controller to route the microphone signal to the computer.
- Web Conferencing Software:Assign the audio input and output device settings to the appropriate Dante transmitter and receiver channels.
③ Network switch to ANI4OUT
Use network cables to connect each ANI4OUT to the network switch. Each interface receives 4 channels of Dante audio, and converts them to 4 analog signals, delivered through XLR outputs or block connectors.
④ Audio from far end to amplifier
Route the far-end audio to an amplifier.
⑤ Amplified audio signal to loudspeakers
Connect the loudspeakers to the amplifier to deliver the audio from the far end.
Video Conference
① Microphone to network switch
Connect the microphone output with a network cable to any port on the switch that supplies power over Ethernet (PoE).
② Computer to network switch
Connect a computer to the network switch to provide control of the microphone and other networked components through the software control panel.
③ ANI4OUT (digital-to-analog conversion)
Each ANI4OUT receives 4 channels of Dante audio, and converts them to 4 analog signals, delivered through XLR outputs or block connectors.
Input: Connect the ANI4OUT to the network switch with a network cable
Ouput: Connect the analog output to the audio input on the video codec
④ Video codec connection to far end
Connect the codec to the appropriate network to connect with the far end.
⑤ Audio from far end to amplifier
Route the far end audio through the video codec audio output to an amplifier.
⑥ Amplified audio signal to loudspeakers
Connect the loudspeakers to the amplifier to deliver the audio from the far end.
Hardware and Installation
Hardware
① Cable Exit
Guide the cable under the tabs and through the routing to exit from the side.
② Bottom Cable Exit
Guide the cable under the tabs and through the bottom exit for permanent table installations.
Note: Use the cable plug accessory when the cable is routed through the bottom.
③ Network Port
RJ-45 jack for network connection.
④ Network Status LED (Green)
Off = no network link
On = network link established
Flashing = network link active
⑤ Network Speed LED (Amber)
Off = 10/100 Mbps
On = 1 Gbps
⑥ Reset Button
Use a paperclip or similar tool to push the reset button.
⑦ Mute Buttons
Four touch-sensitive buttons control the mute status for each channel.
⑧ LED Light Ring
Indicates mute status, with configurable color and behavior states.
LED Light Ring
You can adjust LED light ring settings using Shure Designer software or the device's web application.
In Designer, go to .
In the web application, go to .
Default Settings
| Microphone Status | LED Behavior / Color |
|---|---|
| Active | Green (solid) |
| Mute | Red (solid) |
| Hardware identification | Green (flashing)
Device identify: Entire light ring Channel identify: Light ring segment |
| Firmware update in progress | Green (ring fills up, turns off, repeats) |
| Reset |
Network reset: Red (rotates around ring) Factory reset: Blue (rotates around ring) |
| Error | Red (split, alternate flashing) |
| Device power-up | Blue (rotates around ring) |
Specifications
- Cardioid, Hypercardioid, Supercardioid, Toroid, Omnidirectional, Bidirectiona
Connector Type
- RJ45
Power Requirements
- Power over Ethernet (PoE), Class 0
Power Consumption
- 4W, maximum
Weight
- 362 g (0.8 lbs)
Dimensions
- 3.6 x 13.4 x 13.4 cm (1.4 x 5.3 x 5.3 in.)
| แบรนด์ (Brands) | Shure |
|---|---|
| รุ่น | MXA310W |
| ข้อมูลจำเพาะ | SHURE MXA310W ไมโครโฟน Table Array สำหรับติดตั้งบนโต๊ะ |
| สี (Color) | สีดำ |


